The Pennsylvania State Climatologist is a service to the Commonwealth by the College of Earth and Mineral Sciences and Penn State.
Training Manual for FROST
FROST Training Powerpoint
Installing the Equipment
How to Read Your Rain Gauge
Guide to Measuring Snow
Reporting your precipitation data to FROST
Guide To Measuring Thunder Claps
Guide to Recording Frost
Guide To Determining Snowflake Shape
Guide to Recording Optical Effects
Entering Data
Relevant Documents
Questions or Difficulties?
Back to Main FROST Page
Keep in mind that if you observe weather phenomena at places other than your registered location, or if you see anything unusual or interesting that is not listed on the form, make note and place it in the appropriate Notes field on the forms.
Instruments Needed
Clear plastic high capacity rain gauge with mounting bracket
Clear plastic high capacity rain gauge with inner measuring cylinder and funnel removed -for snow
Ruler or yardstick
Snowboard
Flat object such as a book or board
Warm water for cold weather
Installing the Equipment
When installing the rain gauge it is important to consider its location. The gauge should be placed in an area that is protected from strong winds but is not bothered by obstacles that could either block precipitation from reaching the gauge or cause precipitation to splash towards it. For example, an ideal location would be a small open meadow surrounded by forest, or an open back yard not too close to buildings or trees. Place gauge 2-5 feet above the ground. The rain gauge should be installed at a reasonable distance away from obstacles such as buildings and trees. As a rule of thumb, if a tree is 40ft. tall (taller than a two story house) the gauge should be placed at least 80ft. downwind from it. This will help avoid potential blockage of the rain gauge and provide accurate readings. It is not always possible to find a perfect location. When in doubt, do your best.
Things To Remember When Mounting The Gauge
- Avoid large obstacles that could block precipitation.
- Avoid mounting the rain gauge where sprinklers or other sources of artificial precipitation can affect the data.
- Make sure the top of the rain gauge is level.
- Mount the rain gauge so that heavy rain could not splash into the gauge from any nearby surfaces.
- Mount the rain gauge in an area protected from strong wind, if possible.
How to Read Your Rain Gauge
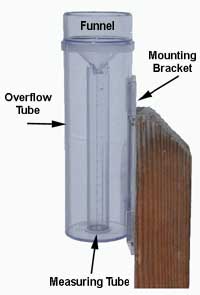
It is important to be as accurate as possible when reading your gauge. Scientists, engineers, and other professionals may use your data. The rain gauge is composed of three parts: a funnel, a measuring tube, and a 4-inch diameter overflow tube, and a mounting bracket. The funnel directs the precipitation into the measuring tube and magnifies it by a factor of 10. This allows observers to report rainfall to the nearest 0.01" (one hundredth of an inch). The measuring tube, when full, will hold "one inch" of rainfall. When it rains more than one inch, the excess water collects in the overflow tube. Reading the rain gauge is a very easy thing to do, but mistakes can occur. Here are several situations that you may encounter when reading your rain gauge and how you should deal with them.
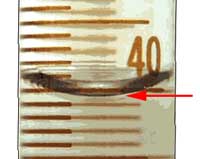
1. The surface of the water in the gauge looks curved. How do I know where to read?
As water fills up the measuring tube, a curved surface is formed called a meniscus. This meniscus is formed by the surface tension of a liquid in contact with the sides of the tube. Always read the base of the meniscus when taking measurements. Here is an illustration to help you understand this process.
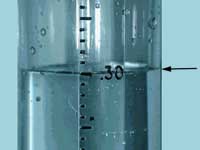
2. What do the numbers mean on the side of the measuring tube and how do I read them?
The measuring tube is designed to magnify the rainwater. This allows more precise readings. Remember that the measuring tube when full holds one inch of precipitation. The measuring tube is divided, marked and labeled in smaller parts (increments) in tenths and hundredths. Imagine that the gauge is equivalent to a dollar, but instead of having one paper bill you have ten dimes or one hundred pennies. The smallest line on the measuring tube would equal one penny. We would write in our checkbook that we have 0.01 dollars, and when recording rainfall you would write 0.01 inches. This is also called one hundredth of an inch. The longer lines on the measuring tube would be like a dime. We record a dime in our checkbook as 0.10 or if you have two dimes 0.20. When recording rainfall that has reached these lines we write them in the same way 0.20. If rain has reached the line .30, you would say that you had three tenths of an inch of rain or 30 one-hundredths. Here is an illustration of the calibrated measurement tube of the rain gauge that contains 30 one-hundredths of an inch (0.30 inches).
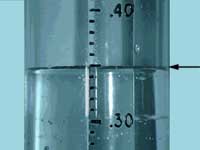
3. What if I have a measurement on the middle line between 0.30 and 0.40?
This would be saying that you have three dimes and five pennies. You would record this as 0.35 inches and report that you have 35 hundredths of an inch of rain. There are nine smaller lines (hundredth marks) between each larger lines (tenth marks). This means that you will never have a measurement like 0.0599, for this measurement would be 0.06. Always remember that the greatest number of decimal places you will have is two. Please do not use your ruler when taking measurements. A ruler is not calibrated to the measuring tube and will affect the data. The most common error observers make is confusing tenths and hundredths. Please be careful, and don't make this mistake.
4. I know some rain fell, but there is nothing (or just a tiny bit but less than 0.01 inch) in my gauge. What should I report?
We call this a "trace" of rain. This should be reported as "T" on your reports. Even if there were just a few drops that don't even dampen the gauge, you should still report a trace.
5. What if there is no precipitation to report?
Just record zero (0.00). It is very important to report 0.00, especially on days when there are scattered storms in the area. It is just as important to know where it didn't rain, as it is to know how much it rained where it did.
6. What do I do if the inside measuring tube is full?
We can determine that more than one inch of rain has fallen by simply observing that the inside measuring tube is full and the additional water has spilled out into the larger container. Remember that the measuring tube will only hold one inch of water. Follow these steps when measuring rainfall more than one inch.
Step 1: You will first need to read the precipitation in the measuring tube, record it, and empty the water in the measuring tube. Do not empty out the water that has collected in the Overflow Tube.
Step 2: You will need to carefully pour the remaining water, from the overflow tube, into the measuring tube, record it, and add up the totals. The easiest way of doing this is by pouring the water into the measuring tube a little bit at a time. You do not have to fill up the tube to the one-inch mark every time, rather fill up the tube half or three quarters of the way, record it, and add up the totals. Be careful not to spill any precipitation. When in doubt, place a bucket or other large container under the gauge as you pour, so that you can collect the water if you do happen to spill. If more than 2.00 inches of rain fell, you will have to repeat the process several times. Make sure you write down each rainfall quantity and add up the total. If you don't write it down immediately, you could forget.
7. Do I report morning dew that has collected in my rain gauge?
On damp, dewy spring and summer mornings a few drops of moisture may collect in your rain gauge. Do not to report this as rain. If the only moisture in your gauge came from dew (rarely will dew collect to more than 0.01 inch), report "0.00".
8. Should I keep a written record of my precipitation data?
Yes, it is important to maintain a written record of your data. This gives you a permanent record and gives us a backup in case we have computer problems. This is also important if we find that your data have been entered erroneously into the FROST computer system. It might happen that a FROST student intern spots a suspicious or erroneous report for your station. If so, they may contact you and discuss it with you. Keep your written records handy. Please do not be offended, we are simply trying to collect the best data as possible. You can print out our FROST Reporting Form to record your data on.
9. What If I leave for a weekend or for a vacation and find precipitation in the gauge when I get back?
Simply empty the gauge and don't log a report on this day.
Reporting "Intense Rain"
During events of heavy rainfall, "Intense Rain" reports can be submitted as a part of the precipitation data. The "Intense Rain" report data are used informally in projecting potential flooding in an area. Intense rain, for the purpose of this project, is defined as at least 0.50 inches of rain in one hour or less. However, we encourage you to report "Intense Rain" any time you believe the rain is falling hard enough to be a potential problem. Intense rain data goes directly to the National Weather Service.
Note: FROST reports may not reach the NWS in time to help them prepare flast flood warnings, so if dangerous flooding conditions are occurring, report first to the NWS or to your local law enforcement or emergency management officials.
Guide To Measuring Snow
- The 4" diameter rain gauges that we use for FROST can be used for measuring the water content of snow. However, you must remove the inner measuring cylinder and funnel for measurements of snow water content and other freezing/frozen precip. The inner tube can easily crack and break if moisture collects and then freezes. But keep the funnel and measurement tube handy indoors -- you'll need it.
- Have a ruler or yardstick ready (ideally one that measures in inches and tenths).
- You should have a snow board (a flat board, painted white, ideally about 16" x 16"). They come in very handy for measuring snowfall. You will need to identify a good representative location that is as flat and level as possible where snow accumulates uniformly and does not melt prematurely. Wooden decks are OK, but they should be at least 20-30 feet away from your house since your house will affect snow accumulation patterns.
- You may need to have warm water handy.
The snow (rain, freezing rain, etc. too) will collect in the 4" diameter outer cylinder (overflow cylinder). If snow collects on the rim of the gauge you have to decide what belongs in or out of the gauge. Take a book or flat object and push gently straight down on the top of the gauge. Whatever falls in is in, and whatever falls out is out. It may not be perfect, but at least it is objective. With wet snows, a lot of snow can collect on the rim, so it makes a difference. Bring the gauge inside at your time of observation. If it has stopped snowing, you can bring it in earlier and just let the snow melt. But you may need to hasten the process. There are two methods for measuring the water content of the snow.
- Place the snow into a saucepan and dip the bottom of the saucepan into hot tap water. The melted snow can then be measured by pouring it from the saucepan to the inner cylinder of the rain gauge. Do not melt the snow by using direct heat from your stoveas this could cause significant evaporation and inaccurate measurements. Sometimes there is precipitation frozen to the side of the gauge - you have to let that melt on its own indoors.
- The other method for melting the snow is to pour hot water into the inner cylinder
of the gauge and record how much is in the cylinder. Pour the hot water into the outer
cylinder with snow and swish it around until it is all melted. Pour the liquid back into
the inner cylinder. The total precipitation is the amount in the inner cylinder minus
the amount of hot water you poured in. For example, let's say 0.51" of warm water was
added to the snow. Then, when the total sample was measured, it read 0.82". How much
precipitation should be recorded? The answer should be 0.31".
0.82" - Total of melted snow with the added warm water
- 0.51" - Total warm water added to melt snow
------------------------------------------------------------------
0.31" - Daily Precipitation (the amount you should report)
Make sure you avoid spilling. It can happen. Some people have come up with creative ways to melt their snow in their microwave or by setting their gauge in a basin of warm water. That way they don't have to add and subtract additional water. Microwaving rain gauge samples is not recommended, but a careful person can do it successfully. When you're done, put the outer cylinder back outside, clean and dry, so it's ready to collect the next snow (During heavy snow [6" or greater] the cylinder will fill to the top and overflow with snow. You will have to measure more often than once daily under heavy snow conditions).
Measuring Snowfall - New Snow Amount
Snowfall is the maximum accumulation of fresh snow during the past day prior to melting or settling. We measure snowfall to the nearest 0.1 (one-tenth) inch. Maybe you have a ruler in tenths, but many do not. Since snow melts and settles, you may have to measure during or soon after snow ends in order to capture how much accumulated. By 7 AM there may be less.
For example, if the snow begins to fall in mid morning, accumulates to 4.2" by 3 PM and then stops and begins melting and settling such that by 7 AM the next morning you only have 2.6" of snow on your snowboard, then the correct number to report for your 24-hour snowfall (new snow amount) is 4.2" -- the accumulation prior to melting and settling. If the ground was bare prior to this snow your snow depth (total depth of snow on the ground) would be rounded to the nearest half inch and would be reported as 2.5 inches.
The trick in measuring snow consistently is simply finding a good place to measure and a firm surface (such as a snow board) for your ruler to set on. Some people use low picnic tables, some use their car. Sidewalks are not recommended since they tend to accelerate melting. Grass is where snow accumulates first, and it is OK to measure on grassy surfaces, but please know that the snow tends to sit up on top of the blades of grass, sometimes by one to three inches. Your ruler, on the other hand, will go right down through the snow and grass to the ground and give you an exaggerated reading. Just be careful to measure to the bottom of the snow, not to the ground.
Measuring new snow accumulation is easy when the snow falls without wind and is not melting on the ground. But when the wind blows, measuring snow becomes a real challenge. We deal with drifted snow by simply taking many measurements from a variety of locations and averaging them to get a representative measure. You will get the hang of this -- with experience. If you use a snowboard, take a core sample and then be sure to clear the board after your measurement and set it in a nearby location level on the surface of the new snow. If you leave it down in a depression, it will tend to collect more snow from drifting if the snow continues.
Snow depth - Total depth of snow on the ground.
Snow depth is simply the total depth of snow on ground at your scheduled observation time (hopefully 7 AM or close). Snow depth is measured to the nearest half inch. It includes both new and old snow, and should be reported even on days when no new snow has fallen. If necessary, take an average of several measurements. For example, if half the ground has 2" of old snow and the other half of the ground is already bare, the average snow depth would be 1".
Snow Cores - Core Precipitation
Under some circumstances (primarily strong winds), your 4" diameter gauge will not catch all of the snow that has fallen. You can watch windblown snow crystals curve around a rain gauge like water going around a rock in a river. If you believe your gauge has not adequately caught the precipitation that has fallen (or, if you're just curious), then take a core sample of the fresh snow that has fallen. After first measuring the water content in the gauge, then take the 4" outer cylinder and "cut a biscuit" in the fresh snow by pushing it straight down. It is best to do this on your snowboard (after you've measured the snow depth, but before you have cleared the snow and put it back on the surface). Use a thin sturdy cookie sheet or something like that to slide under the cylinder so that you can lift it up without spilling the contents. Be sure to measure in a representative location -- not in a drift or in a wind-blown or melted area. Then proceed to melt and measure the water content like you would with any other measurement.
Guide To Determining Snowflake Shape
After measuring snow accumulation on your snowboard or your preferred medium, you are encouraged to take a small sample of snow. To do this, use a ruler, your glove, or some object that will easily isolate a small sample of snow. If there is enough light, you can examine the snowflake on location and record the general shape. If you prefer to record the shape inside, take the small sample of snow with you and then record it inside. Make sure to record the shape quickly before it melts. There will be pictures of the snowflakes in your recording packet so you can mark the picture that the snowflake most closely resembles. At some point at your convenience, but preferable within 24 hours, you can then enter this information onto the web page. The web page will consist of the same snowflake shapes in your packet. Select the shape on the web form and then submit the entry. The following are the basic shapes that will appear on the packet and the website. The images and descriptions are taken the California Institute of Technology snowflake website at http://www.its.caltech.edu/~atomic/snowcrystals/class/class.htm.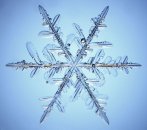
Stellar Dendrites
Dendrite means "tree-like", which describes the multi-branched appearance of these snow crystals. Stellar dendrites have six symmetrical main branches and many randomly placed sidebranches. These crystals are sometimes 5mm or more in diameter, yet they are quite flat and perhaps less than 0.1mm thick.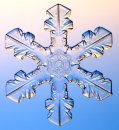
Sectored Plates
Numerous ice ridges seem to divide the plate-like arms of these snow crystals into sectors -- hence they are called sectored plates. Like the stellar dendrites, sectored plates are flat, thin slivers of ice that fall to earth in a stunning diversity of complex shapes.
Hollow Columns Plate-like snow crystals may get more attention, but columnar crystals are the main constituents of many snowfalls. These hollow columns are hexagonal, like a wooden pencil, with conical hollow features in their ends. 
Needles Columnar crystals can grow so long and thin that they look like needles. Sometimes these ice needles contain thin hollow regions, and sometimes the ends split into additional needle branches. 
Spatial Dendrites Not all snowflakes form as thin flat plates or slender columns. Spatial dendrites are made from many individual ice crystals jumbled together. Each branch is like one arm of a stellar crystal, but the different branches are oriented randomly. 
Capped Columns These crystals started out growing as columns, but then suddenly switched to plate-like growth. This happens when a crystal is blown into a region with a different temperature 
Rimed Crystals Snowflakes grow up in clouds, and clouds are made of small water droplets. Droplets that freeze onto a falling snow crystal are called rime, and these pictures show crystals that picked up different amounts of rime. Sometimes a snowflake becomes just a ball of rime, which is then called graupel, or soft hail.
Guide To Recording Frost

The American Meteorological Society defines frost as "The fuzzy layer of ice crystals on a cold object, such as a window or bridge, that forms by direct deposition of water vapor to solid ice." Look for frost to form when temperatures dip below freezing. When recording, please record the percent coverage of frost on your car, lawn or other surface (less than 25%, 25%-50% etc.) within an hour of sunrise. Guide To Measuring Thunder Claps
When you are aware that there is an approaching thunderstorm, listen for the sounds of thunder. Record the time that you hear the first clap of thunder. From this time on, record the time of every clap or rumble you hear until the event's conclusion. A series of claps or rumbles that all occurs within 5 seconds is considered one clap. Moreover, a cluster of rumbles or claps should be counted only once.
Example 1: You hear a clap immediately followed by a series of rumbles. This should be counted only once.
Example 2: You hear a series of claps, and then 30 seconds later you hear another series of claps. This should be counted twice.
Example 3: You hear a series of claps, 3 seconds of silence, and than another rumble. This should be counted once.
Example 4: You hear a series of claps, 7 seconds of silence, and then another rumble. This should be counted twice.
If you have a watch with seconds, record the time of the thunderclaps including seconds since there may be more than one clap in a minute. If you do not have a timing device with seconds in it, simply record the time to the minute. For instance, if you hear a clap at 6:48 PM, and then another clap 40 seconds later when it is still 6:48 PM, make a record that you heard two separate claps at 6:48 PM.
We are not going to separate the thunderclaps by different thunderstorms. So if a morning thunderstorm produces six separate claps and then an evening storm produces 8 separate claps, the claps do not have to be grouped. Simply record what time of day each of the claps occurred. There will be an internet form to record the thunderclap information.Optical Effects
If you see a corona (solar or lunar), rainbow, 22° halo or sundog anywhere in the sky or horizon, please record it. Record the time you saw it. There will be an internet form to enter your optical effects information. Information about optical effects can be found at http://www.atoptics.co.uk.
Water Droplet Phenomena
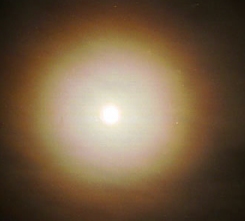
Corona
A corona may be seen when thin clouds partially veil the sun. When searching for a solar corona, shield the sun and reduce the light intensity to safer levels by looking at the sky reflected in a pool of water or a mirror of plain glass. Coronas are more easily seen around a brightly-lit moon.
Staring directly at or near to the sun can permanently damage eyesight.
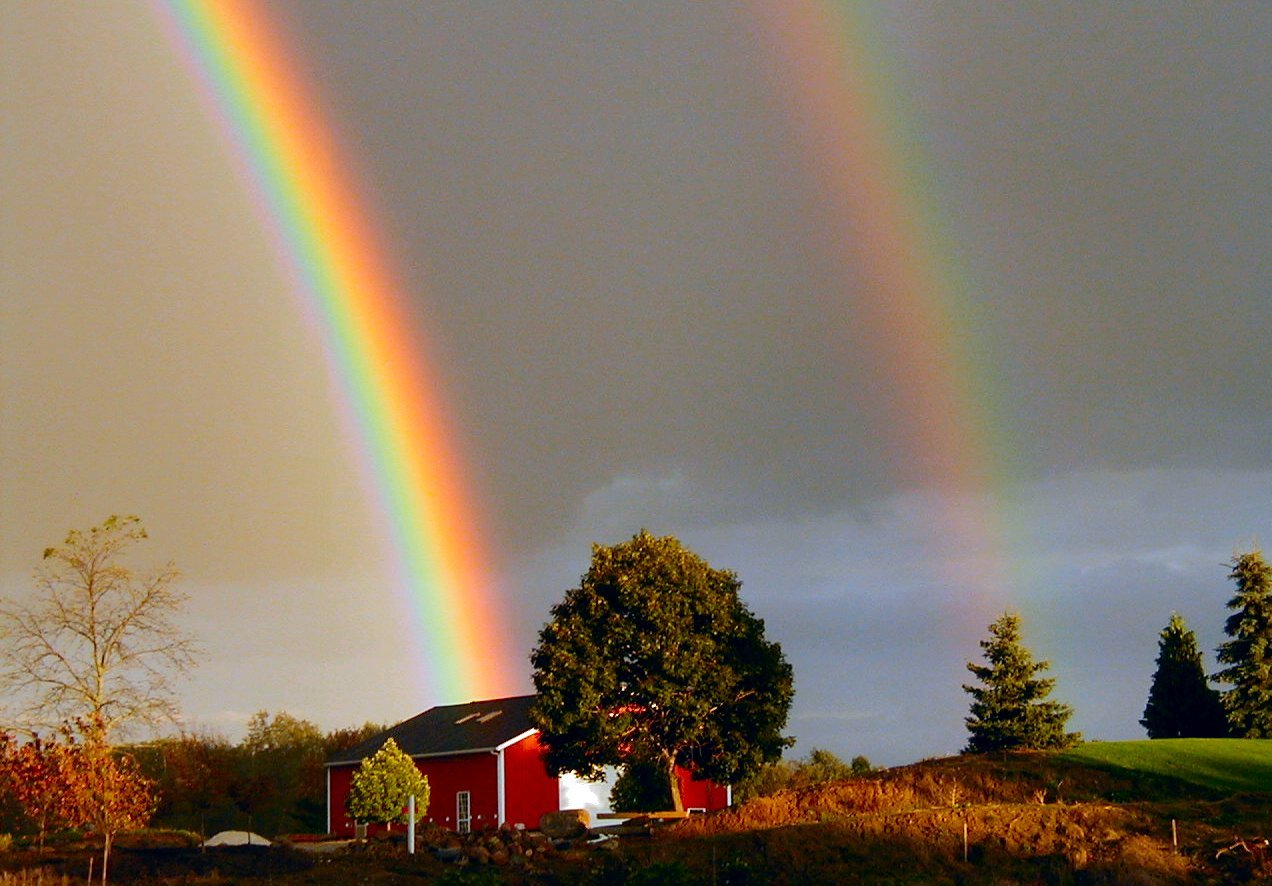
Rainbow Rainbows always form in the sky opposite the sun, during or after a rainstorm where the sun is peeking through the clouds. The sun must be lower than 42° above the horizon, which makes rainbows visible in the early morning, and more commonly, late afternoon. Also look for fainter secondary rainbows about 9° farther outside the primary rainbow. The colors on the secondary rainbow will be the reverse of the primary rainbow. Ice Crystal Phenomena
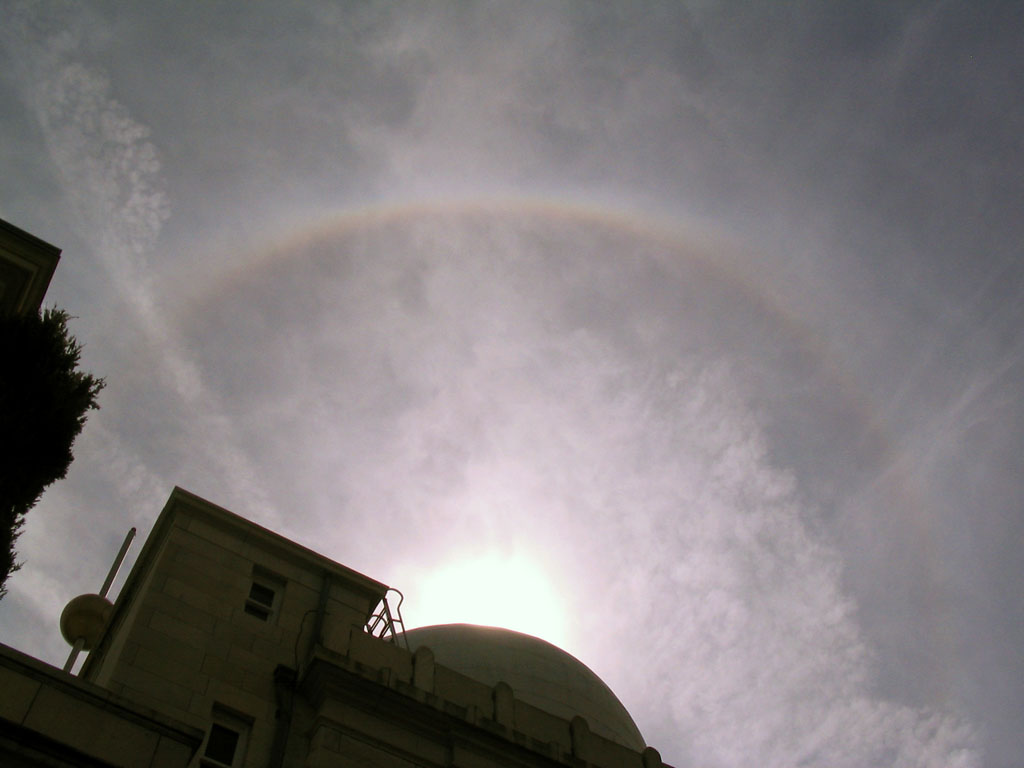
22 ° Halo
Halos are much more easily seen when the sun is shielded. Use a building, a tree, a post or a hand. Always shield both eyes and never look directly at the sun. The most common is the 22° radius circular halo. It is easily found in the sky. Stretch out your arm and spread your fingers wide. The distance from the thumb to the tip of the little finger is then about 20°. Cover the sun with the thumb and the 22° halo will be near the tip of the small finger.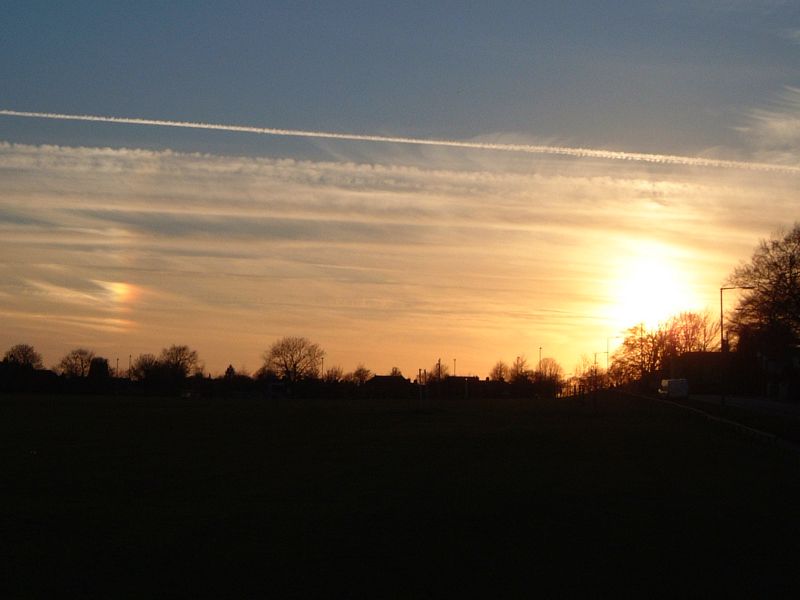
Sundogs
Sundogs (also known as mock suns or parahelia) often accompany 22° halos. Look for them to be on the same level as the sun, usually 22° from the sun. As the sun rises higher in the sky, the sundog will appear farther than 22° from the sun.Reporting Your Precipitation to FROST
It is important to the FROST project that you promptly and accurately report the precipitation data you have collected. FROST scientists, sponsors and collaborators are most interested in precise daily rainfall totals and precise hail reports in which can be mapped, displayed, and put into use. In addition, reports of intense rainfall are helpful in determining locations of potential flooding. Intense rainfall reports are immediately transmitted to the National Weather Service.
When do I report my readings?
You are encouraged to watch your rain gauge anytime it is raining. However, to stay consistent in collecting the data, you are encouraged to take daily measurements of 24-hour total precipitation and report the data as close as you can to 7:00 am each morning. Report 7:00 am was chosen because it does not normally rain at this time during the summer months and most people are still at home. We understand that 7:00 am won't always be possible, and it won't work for everyone. But the closer we are to having everyone report at the same time, the more consistent our maps and analyses will be. This becomes especially important if it is raining at the time you report the data. Always record the time when you did take your measurement so we know for sure.
Transmit all reports by the Internet
Webpage reports: To report data, follow the instructions given on the CoCoRaHS webpage, http://www.cocorahs.org. Click on "Data Entry" on top center of the page. Here you can select the type of data to be entered. Then follow the instructions and fill out the appropriate data form. When you are done, check your entry for accuracy and then click on "Submit". Your reports will immediately be sent to FROST and will appear in the data reports.Relevant Documents
CoCoRaHS Reporting Form
CoCoRaHS Volunteer Application Form
CoCoRaHS Measuring Snow Guidelines
FROST Observation Form
In Case of Difficulties.
If you have any questions or problems, please contact the appropriate FROST staff members provided on the "PA Reporting Communications" form in your observer information packet. You may also use the Contact Us form to get help. FROST is a science education and community-based research opportunity developed by the Pennsylvania Climate Office at the Pennsylvania State University. If you would like to learn more about this program, please contact:
State Climate Office
The Pennsylvania State University
605 Walker Building
University Park, PA 16802
psc@mail.meteo.psu.edu